Reading Time: 8 minutes

Any of the truly dedicated teams or companies will be willing to take on the product photo editor job, and this won’t cost a bomb. Find a trustworthy picture editing company that has a number of positive and honest reviews online.
- Feature precise colors
- Have a transparent or white background
- Reflect the real appearance of the item by means of substantial shadows and reflections
- Showcase brand new, undamaged items
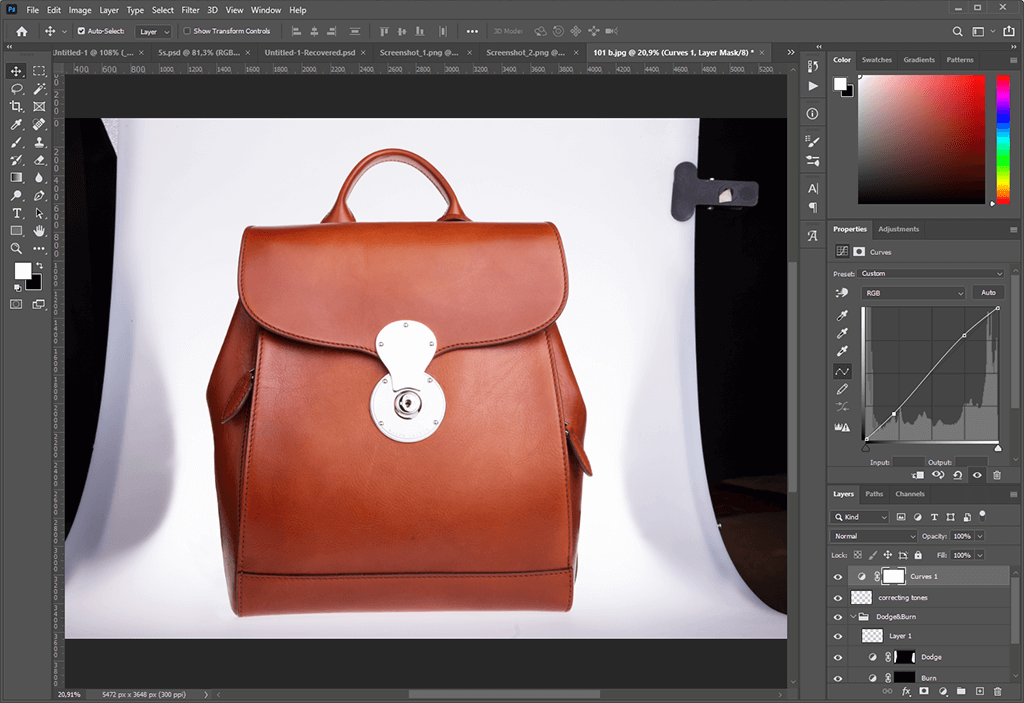
The Healing Brush finds the accordance between value and color, so you only need to pick the desired texture. The rest of the actions are done automatically.
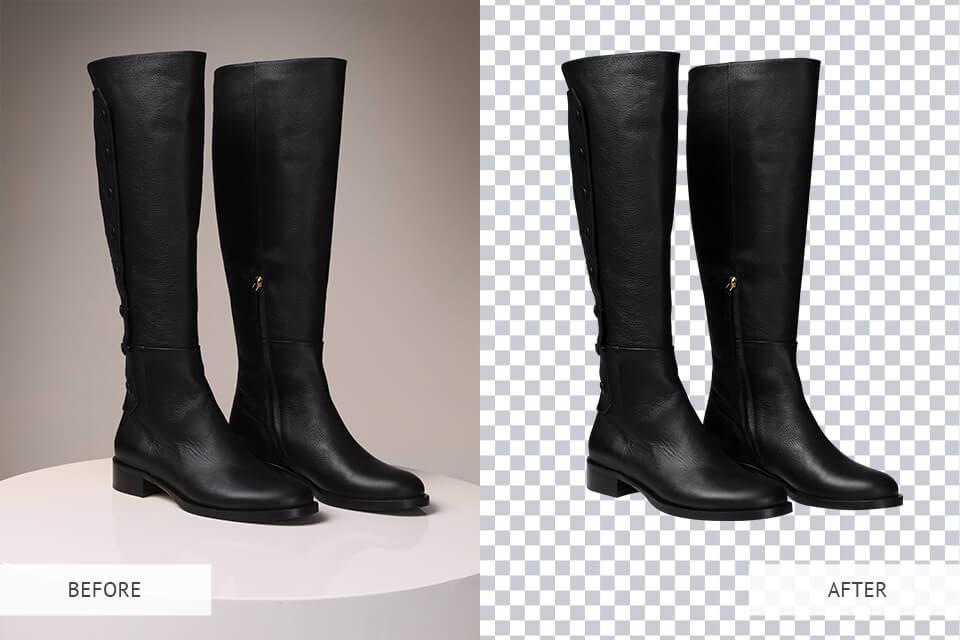
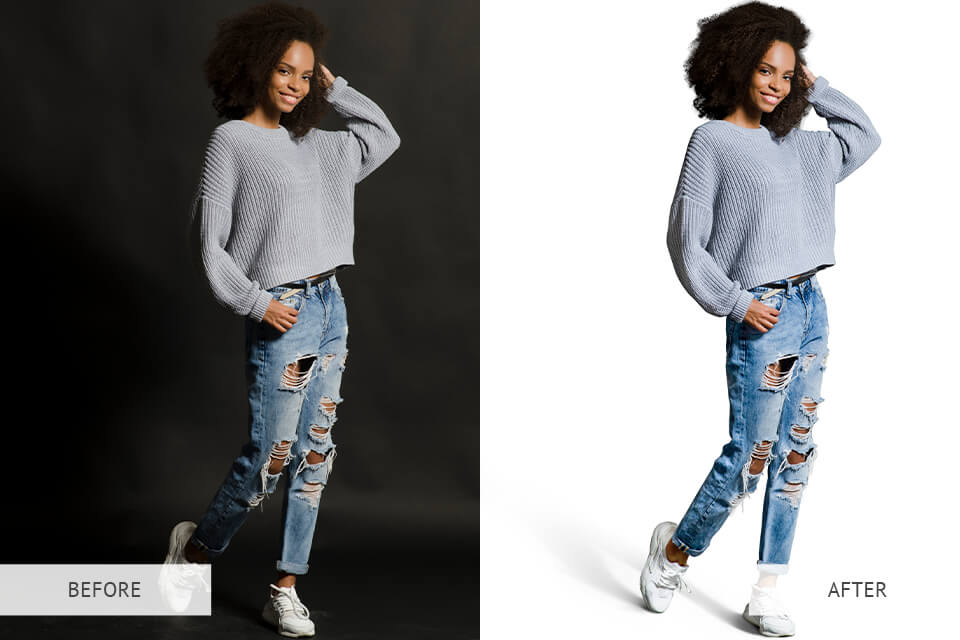
1. Remove Background for a Professional Look
Kate Gross is a professional photographer from Houston who is an expert in creating websites, portfolios, and knows the best places to earn money as a photographer. She is a marketing & graphic design assistant who knows the design and photography industry deeply.
Even if taken by a professional, no product shot is perfect. While you are examining a picture, you may spot slight flaws, like a dust particle or a small stain that has gone unnoticed before. Use photo editing software to get rid of all that.
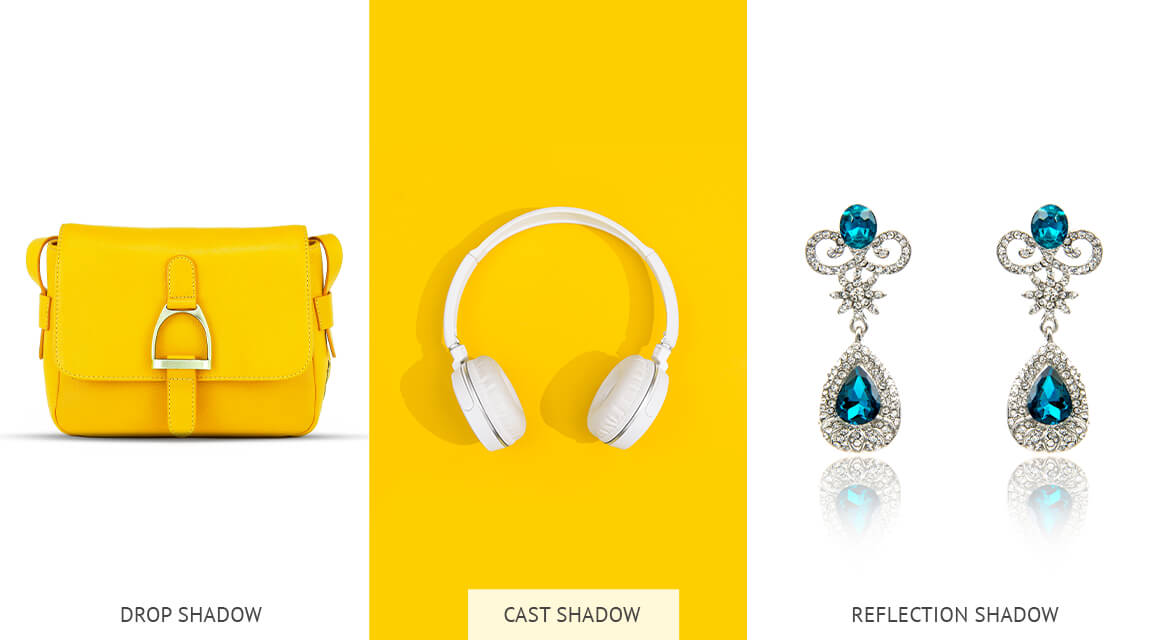
Get ready to work with three main types of shadows: Natural, Drop, and Reflection.
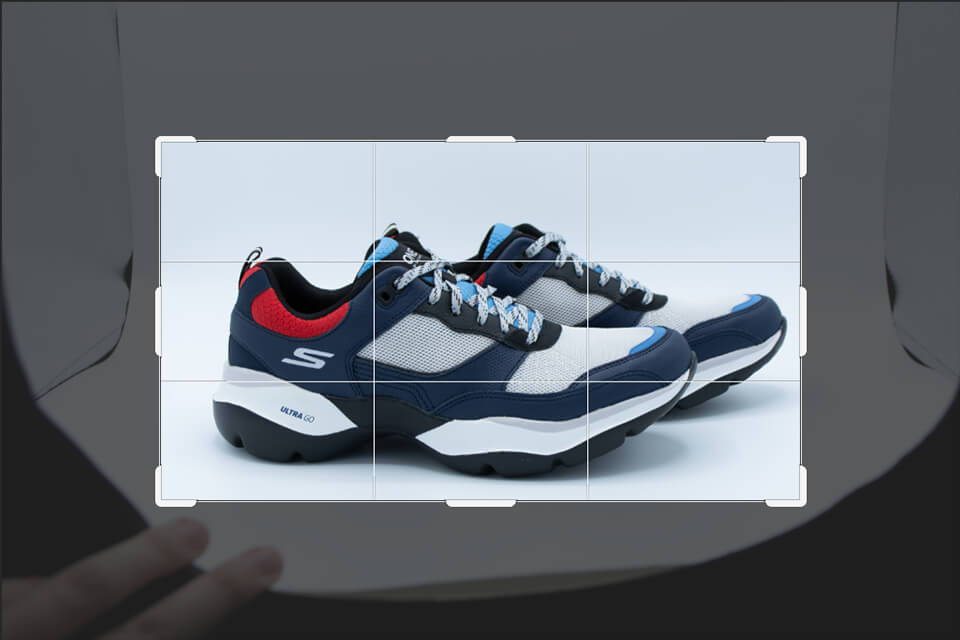
For a perfect eCommerce photo, it definitely has to be cropped. As the DSLR camera takes rather large shots, it will be impossible to upload them to the web store page without prior cropping. One more reason for cropping pictures is to achieve coherent shape and size across all of them. This is particularly necessary if you are going to post several shots of one item next to each other. Otherwise, pictures of different sizes in one line will appear disordered.
2. Use Popular Product Photo Editors

You won’t find more comprehensive software to edit Magento product images and just any picture for eCommerce needs. The time and effort invested in mastering these programs will go a long way towards great product photography editing skills.
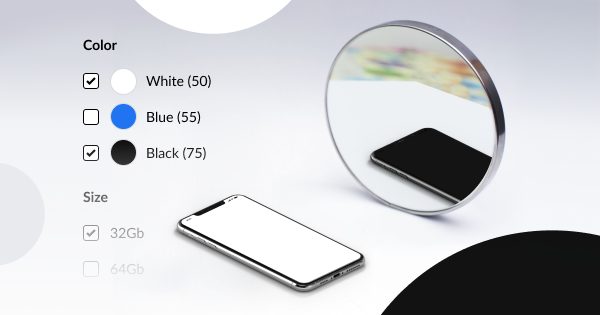
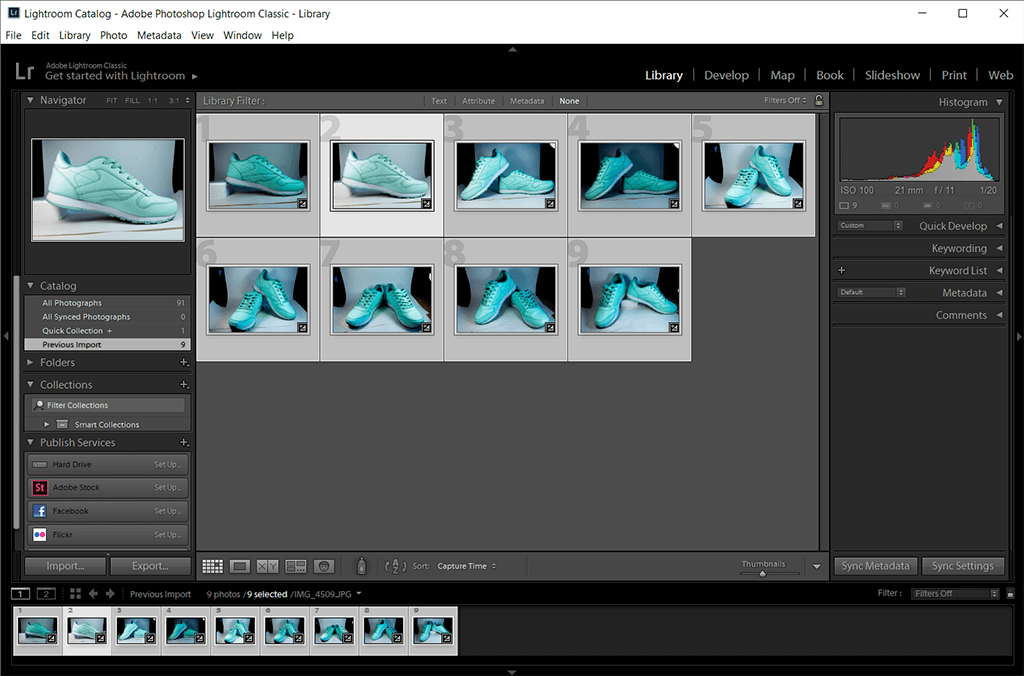
Any visitor or customer of the eCommerce platform expects to see the conformity of visual elements there, including product images. Apart from mental comfort, this serves as a sign of a professionally made and reliable site, so the customers are more inclined to make a purchase. To achieve that conformity, you won’t have to spend hours in front of the PC screen, thanks to the batch photo edit tools.
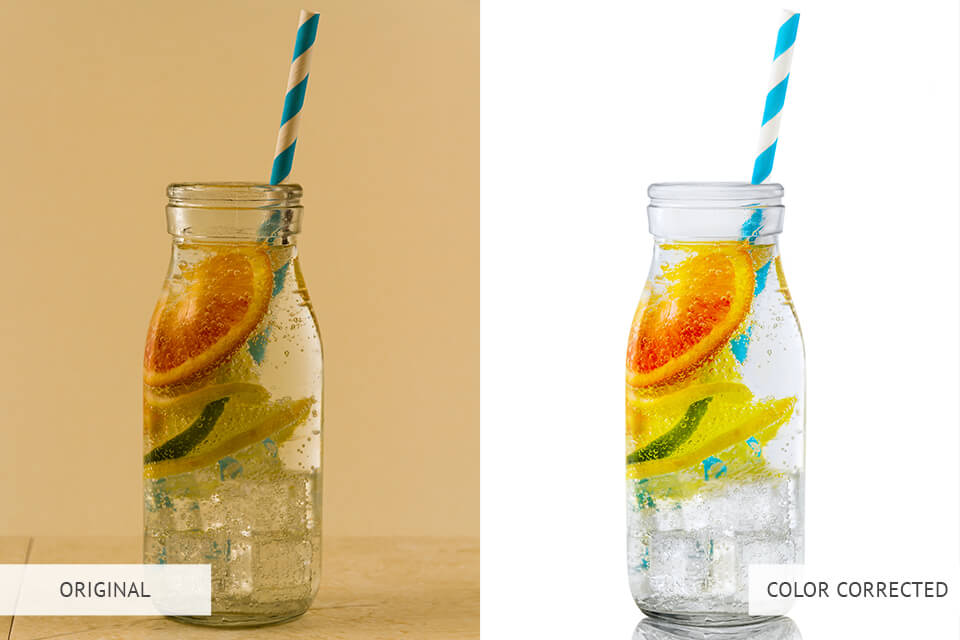
In some cases, the shade of the product may affect the background due to the light reflected from the product. For instance, a red wallet reflects red light on the background, turning the overall tone of the picture into a pink one. All the trimming, such as zippers and buttons, may also acquire a pink shade. That’s where the color correction comes to the rescue, bringing back the natural colors.
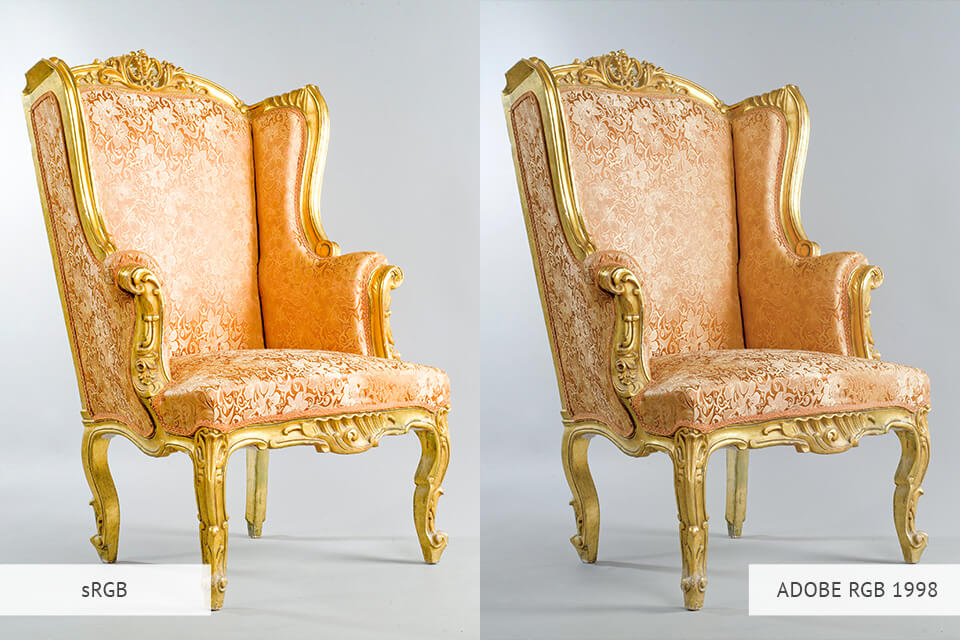
3. Set Image Profile to sRGB to Preserve Colors
Therefore, you should always photograph on a white background, which will considerably simplify the background elimination process later on. Moreover, in case the background is removed, it reduces the file size and makes the pages of an online store load faster.
In fact, a decent eCommerce photo is supposed to demonstrate the item as realistically as possible. When shopping online, buyers can’t feel or see the item with their own eyes. They are buying an item “blindly” and don’t want to be disappointed once they unpack the item and see that it looks different from the picture online. The most prominent web stores only sell products with pictures that:
Reflection shadows are more expressive and even exquisite, giving an impression that the product is located on a reflective surface. Such shadows blend well with sunglasses, watches, and jewelry, which makes customers think that the items are displayed in a glass case or on glass shelves.
4. Use Shadows to Add Depth
When taking shots of clothes, you must have used the mannequins that maintain the actual shape of the clothing item in shots. Although mannequins make the clothes more appealing and realistic-looking, they may distract from the primary subject. A more viable alternative is creating a ghost mannequin effect for product shots.
If you browse the articles on how to edit photos for eCommerce, the first tip you will see is eliminating backgrounds from such pictures, even if the background is already inconspicuous.

Many photographers keep questioning why it is so essential to know how to edit product photos. Wouldn’t it be enough to shoot in a professional studio with properly configured camera settings in order to achieve qualitative shots?
If you have everything set up accordingly, from studio lighting to precise camera configurations, correcting colors at the picture post-production stage won’t be necessary. But you may still resort to color correction techniques with products of particular colors. Vibrant colors and shiny surfaces are more likely to produce undesired toning, which requires correction.
5. Perform Color Correction for Accurate Colors
When people are searching for something in online stores, the color of the item may be one of the main reasons to actually purchase it. Imagine how upset the person would be if they receive an item and see that the shade is inaccurate. As a matter of fact, PC screens and web browsers feature different color profiles, so the same color may vary on a smartphone and PC screen.
Photoshop and Lightroom let you tweak color, white balance, warmth, contrast, exposure, etc. and apply these tweaks to several pictures at once. Simply, find that perfect edit for one shot and repeat the same image editing steps for all pictures in the series within one click. Of course, you may always perform each step manually, but it heightens the risks of occasional mistakes and mishaps. Overall, this is bound to be a waste of time.
A natural shadow appears naturally when the item is located in direct light. It shouldn’t be an issue to capture this shadow effect.
Apart from creating a clear look, the background elimination helps minimize small flaws like hairs or threads sticking out. Once the background is gone, you may either leave it transparent or replace it with a solid background of any color, depending on the colors used in the design of the store and product page design inspiration.
6. Crop Photos for Consistency
Drop shadows make it seem like the item is captured from the top. They mimic the shadows appearing when direct sunlight falls down on the object. Pay attention to drop shadows if you are photographing furniture items. Such shadows produce the effect of furniture that actually stands on the floor. Besides, consider drop shadows when photographing shoes.
The patch tool functions similarly to the clone stamp tool. The only difference is that its selection is blended over another part of the shot. The produced blending effect is ideal for smooth surfaces.
7. Batch Process Photos for Visual Uniformity
If you decide to stick with AdobeRGB or other formats, the shades in pictures will appear distorted, raising the number of dissatisfied customers as a result.
The item is supposed to take up the majority of the frame’s space. An item on an extensive background space looks tiny, so the customers won’t be able to examine it thoroughly. The best placement for the item would be in the middle of the shot.
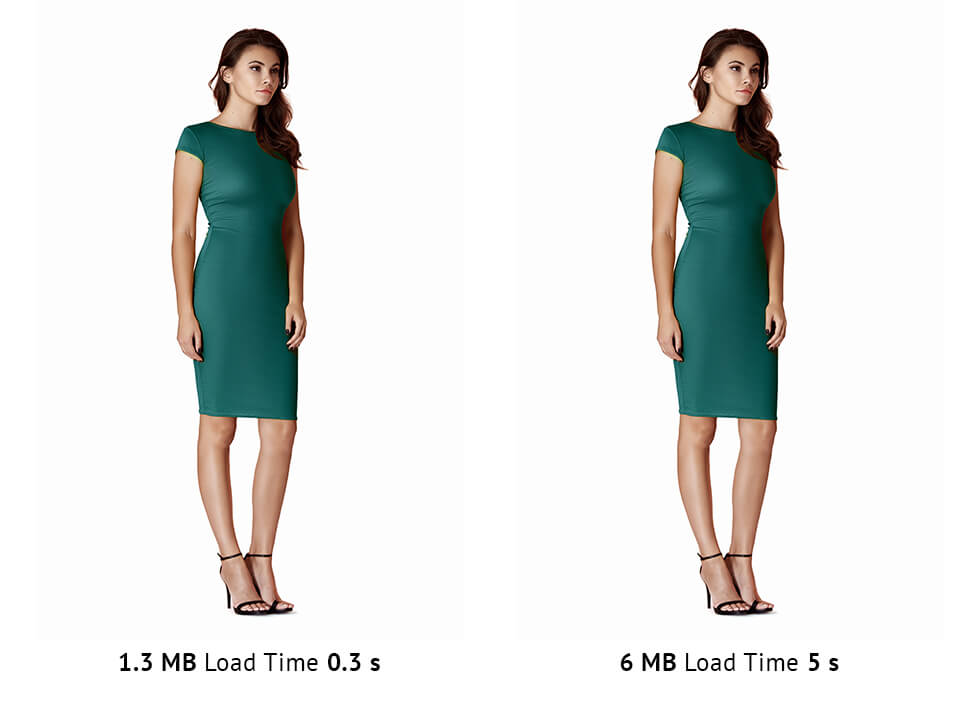
Once the eCommerce image editing process is over, proceed to get the edited shots ready for the web store. The image files you have at hand are larger than necessary, so you need to adapt them to the marketplace’s regulations. This involves resizing and tweaking the resolution.
8. Outsource Ecommerce Image Editing to Save Time
eCommerce image editing also involves adding realism to product shots by means of shadows.
For instance, the tools provided by Adobe Photoshop can cope with eliminating defects at any scale.
Share all your wishes and requests regarding the end result and check that they are indicated in a brief or a contract. This ensures mutual understanding and agreement upon the services delivered. You will receive the edited pictures according to the deadlines set, and you will be able to upload them straight to the store.
Table of Contents
9. Remove Imperfections for a Clean Look

Generally, online product shots are supposed to have 2000 pixels horizontally. This is enough for proper use of zooming and makes the shot appropriate for all well-known eCommerce platforms. The info on how to optimize your photos for SEO will also come in handy if you strive to boost the website’s traffic. Don’t ignore additional Magento extensions, such as Advanced Product Options Suite, and marketing and sales, that help online businesses thrive.
With the clone stamp tool, you may select a part of the shot and then add this selection onto other parts of the shot by painting over them. It is a go-to tool for minimizing flaws within the edges.
To have the most efficient product photo edit tools at your disposal, take advantage of Adobe Photoshop or Lightroom. These top-grade software products are actively used by millions of photographers and regular users around the globe.
When learning how to edit product photos, don’t forget about color correction. The distortion of colors happens mainly because of the improperly configured camera or incoherent lighting.
The “ghost mannequin” technique, also referred to as the “invisible mannequin,” is quite widespread among apparel product photographers. With its help, you will take pictures of a product on a mannequin or a model, then merge the pictures to eliminate the mannequin or a model in photo editors. In the end, you get a nice picture with the emphasis solely on the clothing item.
10. Remove Mannequins to Avoid Distractions
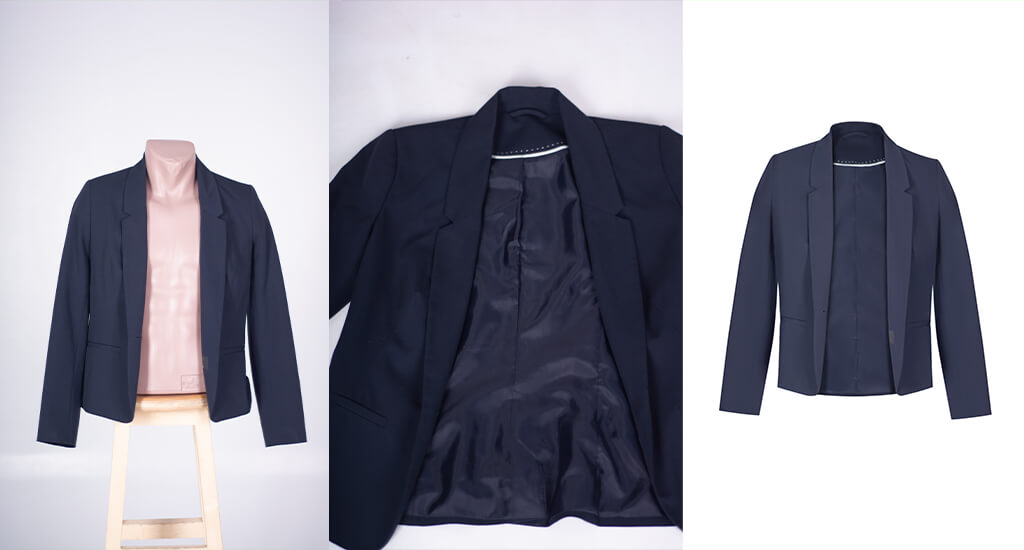
To perform this in Photoshop, select the item, reverse the selection, eliminate the background, and merge several shots (optional). In combination with the 360-degree picture post-production technique, this helps the conversion rate of your eCommerce business skyrocket.
If you aren’t willing to get Photoshop yet, try GIMP, a free and open-source Photoshop analog that is no less robust for eCommerce image editing. Plenty of novices and amateurs opt for Pixlr, which is beginner-friendly and boasts some of the sophisticated Photoshop capabilities.
Canva and PicMonkey are also highly praised by numerous users for having both web and mobile versions. Among the other decent product photo editor options for smartphones are Google’s Snapseed, Fotor, and VSCO.
11. Optimize Your Photos to Reduce the Load Time
Plenty of eCommerce owners don’t want to bother themselves with learning how to edit product photos since they have other business-related aspects to take care of. They delegate these processes to professional product retouching services, which help save precious time and ensure qualitative, prompt results. With a comprehensive approach to editing product shots, the experts make them as flawless as ever, noticing and eliminating any small unnecessary detail. They are aware of the marketplace’s image regulations and fully comply with them.
Discover all the product photo editing secrets in this guide and see how the properly edited product shots can boost the online sales of your clients or even your own business.
Before you begin uploading, ensure that the file size is appropriate, that it doesn’t overload the server and doesn’t slow down the loading time. The optimal picture size contributes to speedy loading and a lower bounce rate. The recommended picture size is from 1 to 2 MB.
Professional product photographers take this into account and convert their .jpeg files to the SRGB color profile. Since the browsers are adapted to decipher sRGB colors, pictures in sRGB will be more vivid in comparison with the non-adapted Adobe RGB pictures.
The author’s bio:
If the item features “extraordinary” colors like neons, the camera may not reflect them appropriately, so the color correction will be a must. In this case, you may avoid extreme color-correct manipulations―simply tweak the item’s saturation, contrast, and hue. If you perform product photo editing in more advanced programs, take advantage of automatic color correction and slider-based manual tweaks.
“Actions” in Photoshop register each edit you make and apply these edits in an identical way to the rest of the shots. As for Lightroom, it allows reapplying tweaks to a selection of shots or the whole library. The performed manipulations can be saved and applied to product shots you will take further on. Batch processing guarantees a quick and efficient eCommerce photo post-processing workflow.